dsh-strength-meter
by chou109
强度表是 DSH Web 开源插件:在设置页按模型统计 Token 用量(环形图、热力图和趋势),数据仅来自本地日志;一条命令安装,重启即可使用。
强度表是 DSH Web 开源插件:设置页按模型统计 token 用量(环形图、热力图、趋势),数据仅来自本地日志。一条命令安装,重启即用。 dsh-strength-meter: a DSH plugin. Settings shows per-model token usage (donut, heatmap, trend), local logs. One command, restart.
安装
dsh plugin --profile web add github:chou109/dsh-strength-meterGitHub 源码安装:首次需按提示配置 allowBuilds 构建授权后重试
安装与环境配置指引、插件开发教程见 DSH 中文社区文档 ↗
安装即在你的机器上以你的权限运行第三方代码——它可读写文件、使用凭据、访问网络,DSH 的工具审批不会为插件代码加沙箱。「检测到 manifest」仅代表发现 dsh.bundle / dsh.plugin 清单,不构成兼容性或安全审查;安装前请审阅源码,不熟悉的插件先在不含密钥的环境试用。
README
dsh-strength-meter:为 DeepSeek Harness Web 打造的一款模型 token 用量统计插件 —— 在设置页提供完整的「使用统计」页面(指标卡、模型用量环形图、活跃热力图、按天趋势),全部数据来自本机会话日志,绝不上传。
| 语言 | 链接 |
|---|---|
| 中文 | 本文档 |
| English | README.md |
目录
如果你是人类请看
这个插件是干什么的
插件在 设置 → 使用统计 新增一个完整统计页面,按以下板块分别展示:
板块 1:六个指标卡(顶部总览)
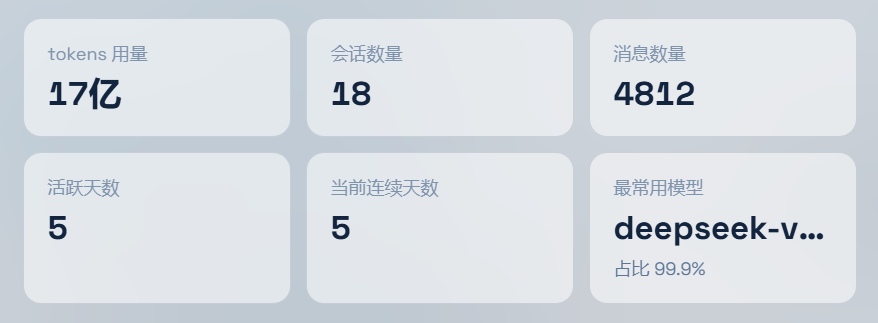
- tokens 用量:所选时间范围内的总 token 消耗;
- 会话数量:范围内活跃的会话数;
- 消息数量:范围内的消息总数;
- 活跃天数:范围内有活动的天数;
- 当前连续天数:截至今天的连续活跃天数(GitHub 式 streak);
- 最常用模型:范围内消耗 token 最多的模型及其占比。
右上角提供 时间范围切换(最近 7 天 / 最近 30 天)和 刷新 按钮(强制重算,绕过缓存)。
板块 2:模型用量(按模型汇总)
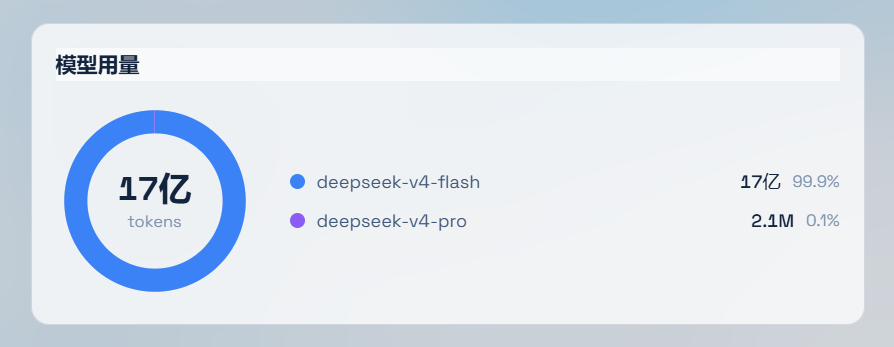
- 环形图:范围内总 token 消耗;
- 右侧图例:每个模型的名字、tokens、占比(%),同名模型跨 provider 自动合并。
板块 3:活跃热力图

- 近 15 周 × 7 天的活动矩阵(GitHub 贡献图风格);
- 颜色深浅按当天 token 用量相对历史峰值分档:≥75% 最深、≥50% 次之、≥25% 中等、>0 浅蓝、无活动留白(图例「较少 → 较多」)。
板块 4:按天 Token 趋势
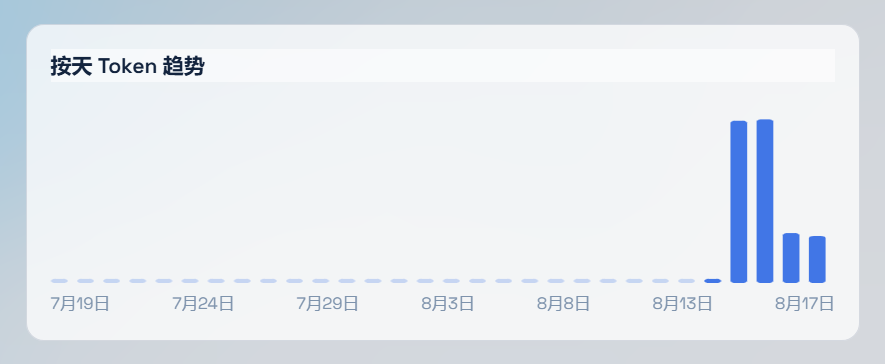
- 所选时间范围内的每日 token 柱状图(悬停可看当天数值),X 轴自动标注日期。
统计来自本机 DSH 的持久化会话日志(~/.dsh/sessions),完全本地、不上传。
手动部署
前提检查(全部满足再动手):
- 已安装 DSH Web(
dsh web能正常启动),浏览器可打开http://127.0.0.1:3080; - 能找到 DSH 数据目录:Windows 为
%USERPROFILE%\.dsh,macOS / Linux 为~/.dsh(下文统一写~/.dsh); - 网络可访问本仓库(或已有一份本地副本)。
方式 A:一条命令安装(推荐,免编译免 npm)
国内网络可改用 Gitee 镜像:
https://gitee.com/chill109/dsh-strength-meter(把下面命令里的仓库地址替换为镜像地址即可)。
Windows(PowerShell):
powershell -ExecutionPolicy Bypass -Command "Invoke-WebRequest 'https://github.com/chou109/dsh-strength-meter/raw/main/install.ps1' -OutFile install.ps1; .\install.ps1"
macOS / Linux / WSL(bash):
bash <(curl -fsSL https://raw.githubusercontent.com/chou109/dsh-strength-meter/main/install.sh)
安装脚本自动完成三件事(幂等,重复运行安全):
- 把源码放到
~/.dsh/plugins/dsh-strength-meter(zip 下载或 git clone); - 在
~/.dsh/profiles/node_modules下创建 junction(Windows)/ 软链(macOS·Linux)指向源码; - 在
~/.dsh/profiles/web/cordis.patch.yml注册dsh-strength-meter插件。
方式 B:手动三步(离线环境 / 想了解原理)
- 获取源码:
git clone https://github.com/chou109/dsh-strength-meter.git(或下载 zip),放到任意位置,例如~/.dsh/plugins/dsh-strength-meter; - 建立链接(loader 的解析根是
~/.dsh/profiles):# Windows(junction,免管理员) New-Item -ItemType Junction -Path "$env:USERPROFILE\.dsh\profiles\node_modules\dsh-strength-meter" -Target "$env:USERPROFILE\.dsh\plugins\dsh-strength-meter"# macOS / Linux(软链) ln -s ~/.dsh/plugins/dsh-strength-meter ~/.dsh/profiles/node_modules/dsh-strength-meter - 注册插件:编辑
~/.dsh/profiles/web/cordis.patch.yml,追加:- insert: - id: dsh-strength-meter name: 'dsh-strength-meter'
最后一步:重启 dsh web 进程(新增插件必须重启,只刷新页面不够——旧页面不会加载新的 boot 清单):
# Ctrl+C 停掉当前 dsh web,再重新运行(具体命令取决于你的启动方式)
dsh web
验证安装成功(重启后依次检查):
- 设置 → 使用统计:左侧导航出现「使用统计」条目,页面显示六个指标卡 + 环形图 + 热力图 + 趋势图;
- 浏览器 F12 → Network:
/plugins/dsh-strength-meter/client.js与/plugins/dsh-strength-meter/usage.json均返回 200。
以上任一步没通过,先看「如果你是 AI 请看」的调试指南,或把截图发给帮你部署的 AI。
怎么让 AI 帮你部署
把下面这段指令直接发给你的 AI 助手(国内网络可用 Gitee 镜像):
请把 https://github.com/chou109/dsh-strength-meter.git(国内更快可用 Gitee 镜像:https://gitee.com/chill109/dsh-strength-meter.git)仓库里的 dsh-strength-meter 插件部署到我的 DeepSeek Harness web profile。严格按照 README 中"如果你是 AI 请看"这一节执行。
如果你是 AI 请看
部署步骤
1. 获取源码(二选一)
git clone https://github.com/chou109/dsh-strength-meter.git ~/.dsh/plugins/dsh-strength-meter
# 或:直接复用 install 脚本(zip/软链/注册一体)
bash <(curl -fsSL https://raw.githubusercontent.com/chou109/dsh-strength-meter/main/install.sh)
2. 链接到 profile 的 node_modules(loader 的解析根是 ~/.dsh/profiles)
# Windows(junction,免管理员)
New-Item -ItemType Junction -Path "$env:USERPROFILE\.dsh\profiles\node_modules\dsh-strength-meter" -Target "$env:USERPROFILE\.dsh\plugins\dsh-strength-meter"
# macOS / Linux(软链)
ln -s ~/.dsh/plugins/dsh-strength-meter ~/.dsh/profiles/node_modules/dsh-strength-meter
3. 注册插件(~/.dsh/profiles/web/cordis.patch.yml 追加,幂等)
- insert:
    - id: dsh-strength-meter
      name: 'dsh-strength-meter'
4. 重启 dsh web。cordis 的 plugin 集合在启动时快照(client-modules 文档明确:"plugin-set changes take effect on restart"),热刷新只对已注册插件的 bundle 内容生效。
5. 验证
GET http://127.0.0.1:3080/plugins/dsh-strength-meter/client.js→ 200,内容以window.__ModuleLoader__.load({开头;GET http://127.0.0.1:3080/plugins/dsh-strength-meter/usage.json?days=30&force=1→ JSON,字段:total / models[] / sessions / messages / activeDays / streak / topModel / byDay[] / heatmap[] / days;- 页面
window.__DSH_BOOT__的entries数组应包含{ id: "dsh-strength-meter", ... }。
架构
一个 cordis 插件,两个面(face):
dsh-strength-meter/
├── lib/index.js      # Host 面(Node):用量聚合 + web 路由
├── lib/fold.js       # 纯函数折叠器(可单测):事件日志 → 按模型/按天统计
├── lib/client.js     # Client 面(浏览器,预构建产物,随仓库发布)
├── src/client/*.tsx  # Client 源码(esbuild 构建,见 scripts/build.mjs)
├── scripts/build.mjs # 自包含构建:esbuild(cjs) + __ModuleLoader__ 包装
├── install.ps1 / install.sh
└── tests/            # fold 单测 + host/bundle 冒烟测试
Host 面(lib/index.js)
- 依赖
webServer、sessions(entryinject声明,平台标准做法),注册 exact 路由/plugins/dsh-strength-meter/usage.json(exact 优先于 client-modules 的/plugins前缀路由,不冲突)。 - 数据源按可用性回退:
ctx.sessionPersistence(完整历史,可选):listSnapshots()返回{ header, revision }(id 在header.id)→ 冷会话按revision缓存折叠结果,只有变更的日志才重算;ctx.sessions(兜底):只统计内存中的活跃会话。
- 折叠规则(
lib/fold.js,与 token-meter 语义对齐):request/header的data.header.config.{provider,model}决定后续样本的归属(采样时记录,位置正确);- 用量样本:
assistant/chunk中chunk.type === "usage",或assistant/message的usage字段;同一(turn,step)下 message 样本替换 chunk 样本; - 求和口径:input + cacheRead + cacheWrite + output;按天(本地时区)与按模型双向聚合。
- 查询参数:
days=7|30在样本级过滤窗口(老数据不会漏进窗口),force=1绕过 15 秒 TTL 缓存; - 指标:tokens / sessions / messages / activeDays / streak(全量历史)/ topModel(含占比)/ byDay[] / heatmap[](15 周 × 7 天,颜色按当天 token 相对历史峰值分档)。
- 响应带
debug块(live/persisted 计数与错误列表),便于排查。
Client 面(src/client/)
- 入口
inject: ['slots','locale','sessions'],注册一个插槽:settings.section(root 作用域)→StatsSection:完整「使用统计」页面(指标、环形图、热力图、趋势),label 来自nav.stats词条。
- 同名模型(跨 provider)在渲染前合并为一行,占比重算。
Bundle 契约(必须遵守,否则页面 boot 失败)
window.__ModuleLoader__.load({ id: "dsh-strength-meter", factory: (require) => { /* CJS */ return module.exports } })
- 产物必须是已构建的(仓库自带
lib/client.js,安装端不需要构建); - 外部依赖只允许
react、react/jsx-runtime与@deepseek-ai/*(ModuleLoader 的 seed/static/factory 表解析),禁止打包平台代码; package.json需要exports["./client"]与dsh.client声明(见本仓库package.json,照抄即可);- bundle 的 ModuleLoader id 由构建脚本从
package.json的name动态读取,改名不会脱节。
调试指南
| 症状 | 排查 |
|---|---|
| 设置里没有「使用统计」导航 | F12 看 window.__DSH_BOOT__ 是否含 dsh-strength-meter;不含 → 没重启 / cordis.patch.yml 未注册。含 → 查 Network 里 /plugins/dsh-strength-meter/client.js 是否 200。 |
| 页面空白 / 指标全 0 | 先看 usage.json 响应里的 debug:live/persisted 是否为 0、errors 里有什么;sessions:0 时检查 host 是否重启(旧 host 代码返回的字段不完整)。 |
usage.json 404 |
Host 面没起来:检查 dsh 日志是否有 dsh-strength-meter: usage route 相关报错;确认 webServer/sessions 存在(web profile 必有)。 |
| 热力图全空白 | 确认 usage.json 的 heatmap 数组非空且 level 有非零值;页面侧需要硬刷新(Ctrl+Shift+R)加载新 bundle。 |
| bundle 语法错误导致白屏 | 自己改过 lib/client.js?重新 pnpm install 后 npm run build,或从仓库还原产物。 |
重新构建客户端(改 src/client 后)
cd dsh-strength-meter
pnpm install        # 首次(改名/移动目录后 junction 可能失效,重装一次)
node scripts/build.mjs
# 产物写入 lib/client.js(连同 source map,便于浏览器调试)
已注册插件改 bundle 不需要重启:刷新页面即可(client-modules 按内容 hash 重新注入)。若本机有 pnpm run dev:web 的 watcher,则是即时热更新。Host 面(lib/)改动则需要重启 dsh web。
测试
node tests/fold.test.mjs      # 折叠/窗口/热力图单测(零依赖)
node tests/host.smoke.mjs     # 路由 + usage.json 冒烟
node tests/bundle.smoke.mjs   # bundle 契约冒烟(模拟 __ModuleLoader__)
操作方法 / 扩展指南
- 改文案:
src/client/locales.ts(中文为 key 源,en 必须与 zh 键集一致)。 - 改统计维度:改
lib/fold.js的折叠(事件类型看dsh-session的日志事件),再在StatsSection里渲染;接口字段同步更新本 README 的验证清单。 - 改热力图分档:
lib/fold.js的levelOf(当前按当天 token / 历史峰值比例分 4 档)。 - 新插槽:在
src/client/index.ts的ctx.slots.inject(...)里仿照现有注册加一块,组件 props 按{ t, ...注入面 }解构。 - 数据不上传:聚合只发生在本机(Host 面读取
~/.dsh/sessions的持久化日志)。
License
MIT —— 见 LICENSE。
原始 README: https://github.com/chou109/dsh-strength-meter/blob/main/README.zh.md ↗
同类插件
查看全部 →
agent-vision-toolkit
为纯文本模型"看图“设计更好的视觉工具箱和技能,支持多图理解,图片问答,前端UI还原、GUI 自动化等,并可选无缝接入多个主流agent,直接识别粘贴图片| A vision toolkit and skill designed for text-only llms — image Q&A, long-screenshot OCR, frontend UI restoration, and GUI automation, with optional seamless integration for Codex, Claude Code, Pi, Oh My Pi, and OpenCode

api-relay-audit
从 DeepSeek Harness 对 AI API 中转站和 LLM 代理运行本地安全审计,生成 Markdown 报告,覆盖提示词注入、模型替换信号、工具调用改写、错误泄漏、流完整性和按 profile 启用的 Web3 风险。

OpenStory
✨ OpenStory 现已支持 DeepSeek Harness 插件! 现在可以通过 dsh-openstory 将 OpenStory 多智能体推演接入 DeepSeek Harness,让 agent 直接启动模拟、查看角色、下达指令并逐回合推进故事。查看 DSH 插件配置与使用指南。

phi
pi的编码代理 ∞ 提供者、子代理、hashline编辑和权限门

anysearch-dsh
DeepSeek Harness(DSH)的 AnySearch 网络搜索提供方与高级搜索工具。

codex-switch
Codex Switch 是一个 macOS 工具,一键配置 Codex 的自定义 API,同时保留官方 OpenAI 登录。保存后 Codex 的模型选择器里只会出现你选的那个 provider 的模型。也支持 Claude Code 的官方 / 自定义 API 切换。Codex Switch is a lightweight helper for configuring multiple coding-agent API routes. For Codex, it keeps Official OpenAI and a custom API provider configured in parallel, registers the custom model in Codex's mod